| Notes on the install* | |
|---|---|
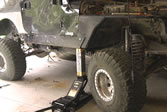
This video shows the installation of a JKS Engine Lift # 8100 on a TJ Rubicon. This was done after the Currie Body lift was completed to keep everything proportional and to keep the fan shroud from binding. When performing this install, do the passenger side first to get a feel for the process. The driver side was more difficult because the cross bolt that holds the rubber insulator gets bound up on the air conditioner condenser pump when trying to remove it. As a result, the entire engine support bracket assembly from the engine has to be removed. When you put it back together use this sequence: |
|
| Installtion of a Currie Body Lift on a 2003 TJ Rubicon |
 |
| Installation of a Savvy Offroad Aluminum Gas Skid on a 2003 TJ Rubicon |
 |
| *Please make sure you do your research before attempting any project. This video, while containing helpful information, may not include all the information you need for your application. Note that any work you do based on this information is at your own risk. | |